So, you want to learn how to start a blog, huh? It’s no secret that I think the absolute best way to get started building a business online is to start a blog.
You’ll hear many people make arguments like “a blog isn’t a business” or “you don’t need a blog to have a successful business.”
While there is probably some truth in those statements, the reality is that starting a blog serves as an excellent training ground regardless of the type of business you want to build.
To name just a few of the skills you can learn by starting a blog:
- Learn how to setup a site on WordPress (the best platform for those just beginning or are non-technical)
- The basics of Search Engine Optimization
- The importance of copywriting and how to create content that gets shared
- Social media for business
The list goes on.
You may have also heard people say that blogging is dead. Trust me. Blogging is not dead.
Table of Contents
Your first 365 Days of Blogging
These are the 5 best pieces of advice I have for your first year of blogging. Watch this, take notes, and keep these things in mind as you go through the rest of this post and get started with your new blog or niche site.
Blogging Terminology: A Quick Glossary
- Domain: The domain name is the identifier that helps to locate a website on the internet. For instance, as you can see above, this site’s domain name is locationrebel.com.
- Hosting: A company that “hosts” (stores) websites in high-powered servers that connect to a network. It is where all the data for your blog lives.
- Bluehost: Bluehost is a hosting company that also offers domains for purchase. Here’s my full Bluehost Review.
- WordPress.com: This is a site where you can host your website for free, but there will be certain limitations. Generally speaking, this isn’t the best way to start a blog, but we talk about how to do it a little bit below.
- WordPress.org: This is a self-hosted install of the WordPress content management system. It is slightly more technical but infinitely more flexible. You will need your hosting for this. It is the recommended way to start a blog, which is what most of this tutorial will cover.
- Plugin: A special piece of code you can add to your WordPress site to add functionality. Examples might be plugins for a contact form, sales page, membership site, or advanced menus.
- Widget: A feature on the backend (the part of a website only you can see) of your site that adds design features such as sidebars or footers.
- Theme: A WordPress theme allows you to easily change your site’s look and feel while retaining the same content and information.
So, do you think it’s right for you?
Let’s get your site up and running.
Join over 40,000 people who have taken our 6 part freelance writing course. Sign up below and let’s do this together.
By entering your email address you agree to receive emails from Location Rebel. We'll respect your privacy and you can unsubscribe at any time.
The Elephant in the Room: Is Blogging Dead?
You might be thinking, “Soooooo, I thought blogs were dead….is this even worth my time?”
And I’d forgive you for saying that and then explain why blogs are not dead.
But for a quick answer, let me ask you a question:
When was the last time you did a Google search, and the answer showed up in the form of Instagram, Tik Tok, Snapchat, Facebook, or a Podcast?
Exactly, blogs are still very much a thing, and I’d argue they will be even more important over the next 5 to 10 years.
How to Start a Blog for Free in 2023
There are a lot of different services out there that will allow you to start a blog for free.
That said, if you’re serious about blogging, I recommend spending a little bit of money so that you can have your own domain, better hosting, and more flexibility with your site.
But if you’re totally strapped for cash and aren’t as concerned about starting a blog as a business or getting your site to rank in search engines, then the best way to start a blog for free is at WordPress.com
WordPress.com looks very similar on the backend to WordPress.org. But with this option, WordPress themselves will host your site for free – but they will really limit the things you’re able to do on the site. Things like:
- Add special plugins
- Monetize the site
- Rank well within search engines
This is why it’s not recommended.
That said, we think this is the best free blog service out there because if you ever decide to move to the self-hosted version of WordPress.org, it’s much easier to make that transition.
So how do you set up a blog for free in 2023?
It’s really easy.
- Go to WordPress.com
- Click the link in the top right that says “Get Started”
- Follow the prompts!
Seriously, that’s it. You’ll be up and running in almost no time.
But if you’re serious about growing a larger blog or turning it into a business, then you’ll want to go with WordPress.org, and that’s what the rest of this post is devoted to.
Why Choose WordPress.org to Start a Blog?
By starting a site of your own, even if you have no direction or a specific topic in mind – you can get way ahead of the game by going through this process.
In the most basic terms, WordPress is an open-sourced website creation tool. It is easy to use but extremely powerful content management system (CMS) for your website. That means you can manage all of your content (blog posts, pages, product descriptions, etc.) right from one place.
WordPress is the most popular CMS out there. Small blogs and huge brands all use it because it’s relatively simple, easy to customize, and powerful all at the same time. So, it’s the best choice out there.
Here are some of the basics of WordPress:
- Cost: About $150ish per year. Typically hosting is about $10 per month, plus a URL is about $15 a year.
- Themes: There are thousands of free themes you can use with WordPress, or you can upgrade to a premium theme (we’ll highlight that more later) for anywhere from $25 – $75 and up for a one-time fee.
- Customization: Lots of potential here. You can add any of thousands of plugins to make your site work well without needing any major web development tweaks.
So for those of you most serious about learning how to start a blog, this is the way you’ll want to go.
And looking for more philosophical reasons why you should start a blog? Here you go:
The 3 Steps to Starting a Blog on WordPress in 2023
Chances are you know you want to start a blog of some sort – but you’re not entirely sure how to start, or what you’re going to write about.
No problem!
The good news is that starting your website is actually really simple, and even without an idea or a direction, we can get going right now.
Here are the three simple steps to starting a blog
- Choose a domain name. No clue what to call your site? Use a variation of yourname.com
- Get a hosting account. For less than $100 for your first year on Bluehost, you can get a domain and host for unlimited sites (that’s what we’ll be using in the tutorial below). You can check out our tips for choosing a hosting service here.
- Install WordPress. They make it super easy with a single click.
Does this still seem daunting?
Don’t worry, it’s much easier than it sounds and we’re going to walk you step by step through how to start a blog in excruciating detail – so you have no reason not to get going 🙂
Ready for this? Ok, settle in, and let’s get it going!
Step by Step: How to Setup a Blog on Bluehost
Ok, ready to learn how to start a blog? Grab a cup of coffee, and within the next hour or so, you’re going to have the basics of a site up and running. Trust me; this has the potential to be a total game-changer in your life if you treat it as such.
So I’m personally excited to see where you take this 🙂
Step #1: Go to Bluehost
Now that you’ve got those down, it’s time to get this thing rolling and get your hosting plan set up. Head over to Bluehost to get started.
Why do I say
Here’s our detailed breakdown of how to find the best blog host for your new site.
Short answer: for 95% of you,
I’ve used close to a dozen different hosts over the last 8 years for different websites. And for when you’re just getting started,
That last one is a big deal because you will have a learning process to go through. Having solid customer support is extremely important, and I’ve spent hours on the phone with them over the years.
Note: If you have a higher-traffic site or want a little extra customization, I recommend WP Engine.
However, for 95% of people getting going, Bluehost is the way to go. Not to mention, they’ve been super cool and are hooking Location Rebel readers up with a special link that makes this a total no-brainer.
If you click this link and join, you get in at $2.95/month for the first year, a great deal. When you get to the site, you should see:

Note: this pricing might be different for those outside the US.
Step #2: Click “Get Started Now” and Choose Your Plan
It’s pretty simple here.
If you think you’re only going to need one site for the foreseeable future, just go with the basic plan. Most of you, especially as you are starting out, will fall into that category.
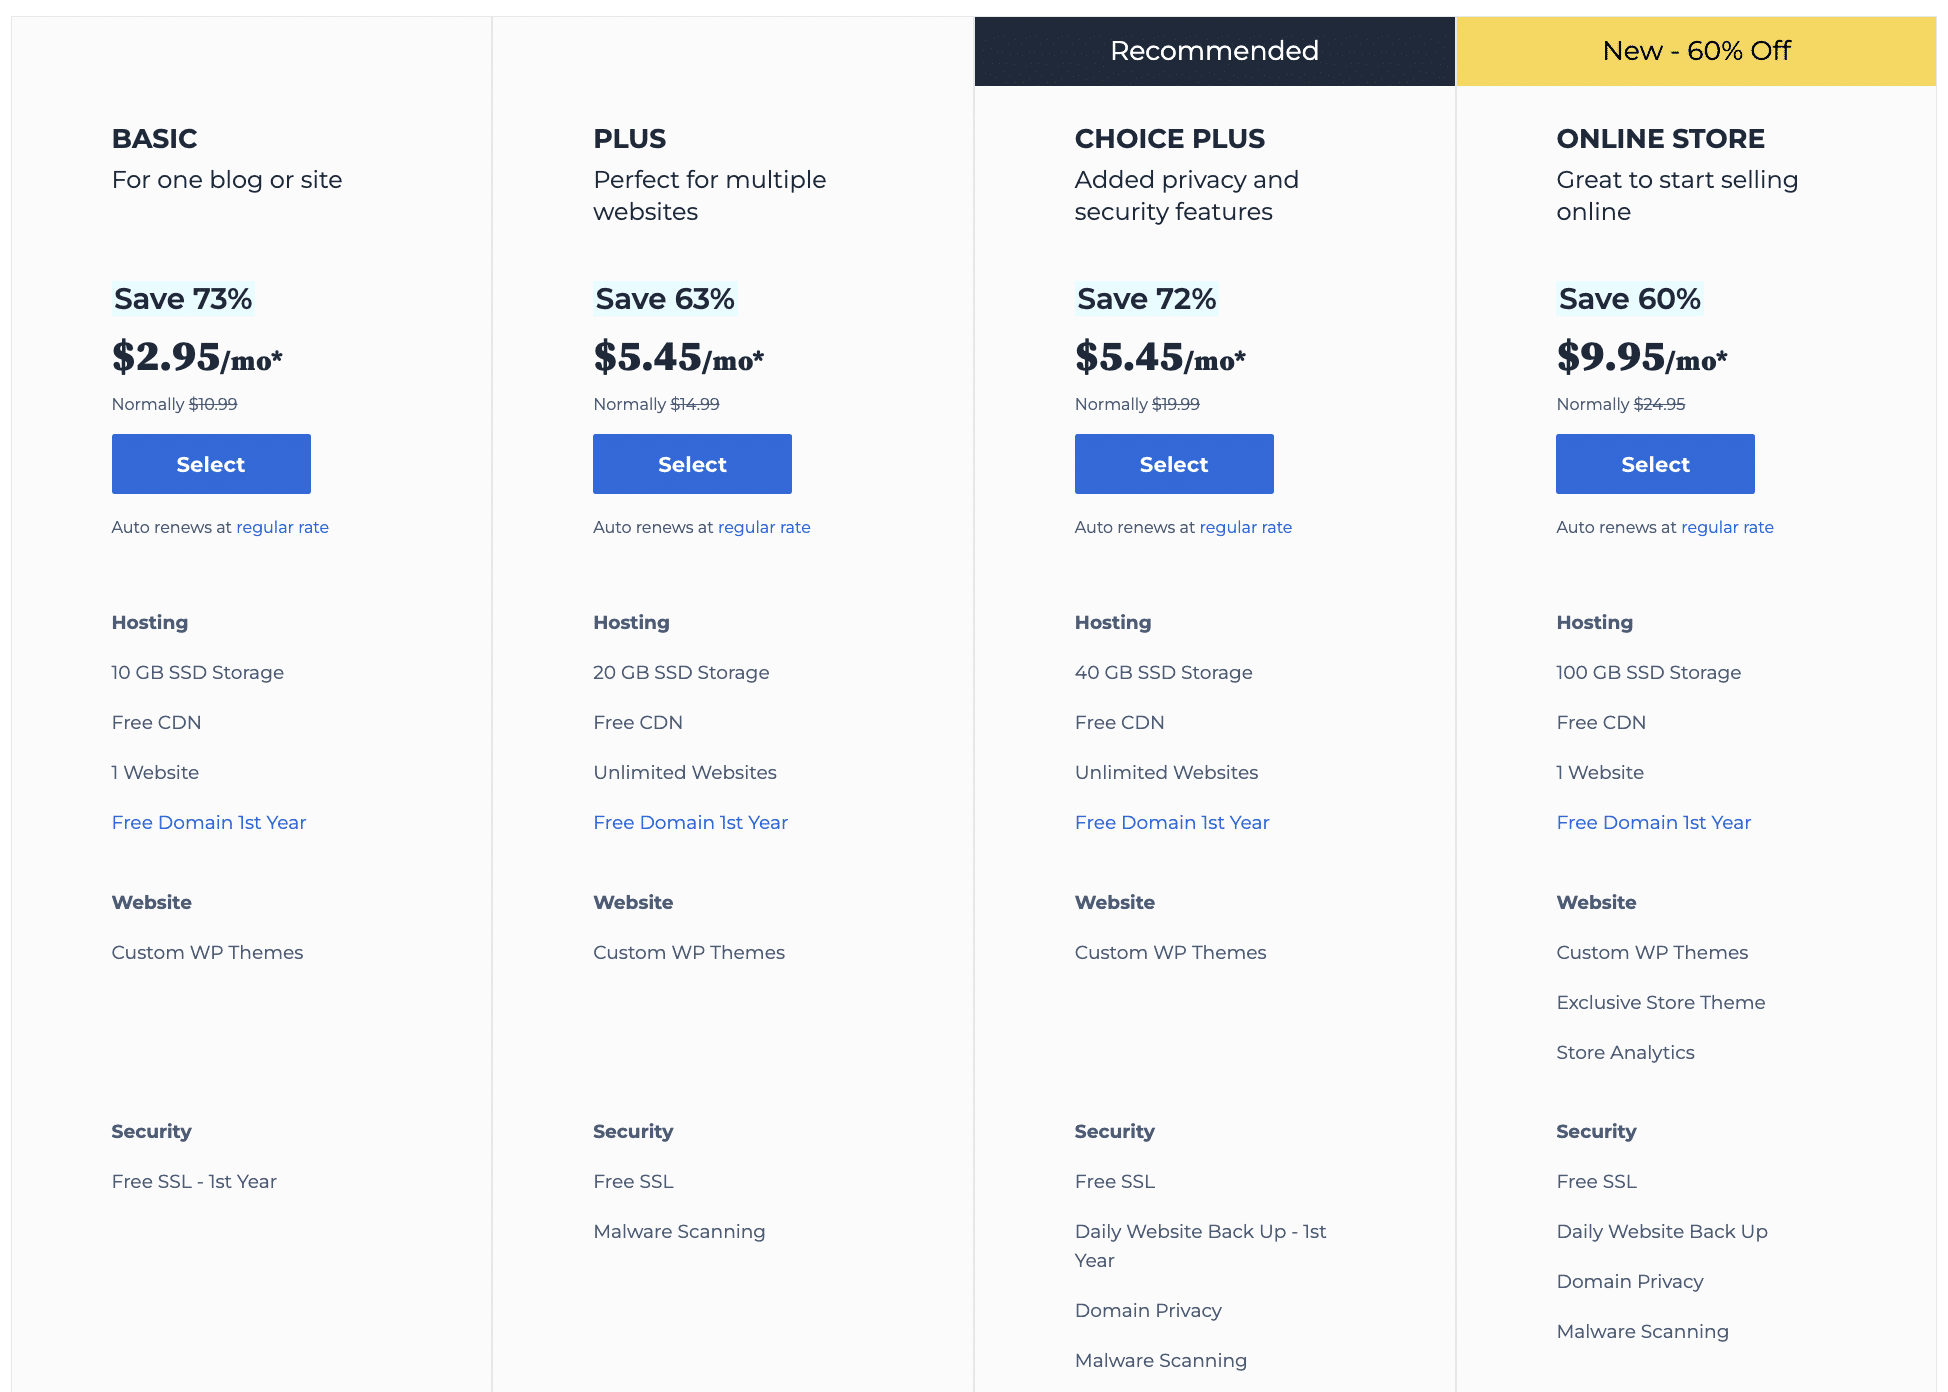 However, if you think you might want to create a few different sites, then the “plus” level for under $70 for a year is a no-brainer. I generally recommend this for people who know they are going to start a few things down the road. For instance, they might want to build a few niche sites and are also looking to start a website for their freelancing services.
Step #3: How to Choose a Domain Name for Your Blog
Now we look at domain names (the URL for your website).
If you’ve already bought your domain name yet, enter it into the box that says ‘I have a domain name.’
If you don’t have a domain yet, then this is the fun part. 🙂 A lot goes into a domain, but you shouldn’t stress too much about it.
Remember, you can always buy a new one for about $10/year and if you have the unlimited plan, you can set up as many sites as you want!
Choosing Your Domain
- Not sure what you want to do? Get a version of yourname.com. Even if you choose something else, it’s always a good idea to secure a version of your name as well. If your name is taken, try your initials or yournamewriter.com or something like that.
- A .com is ideal, but it’s not a deal-breaker. Just try and stay away from top-level domains that are strange (info, guru, or anything else that isn’t a com, net, or org)
- Try not to use dashes. And only use one at MOST. Example: nichesitebuilder.com is much better than niche-site-builder.com. Dashes lose trust.
Obviously, there’s more to it than just a name. Having an idea of what industry or niche you’re going to be blogging about is important. Learn how to choose a niche for your new blog here.
This video may also be helpful:
From there, we recommend checking out Namecheap to see what URLs are available.
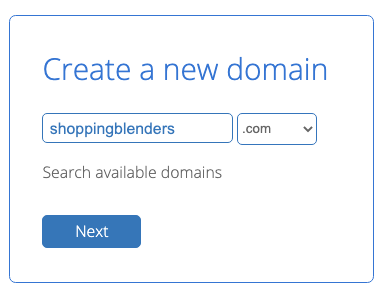
Let’s say you’ve got your heart set on blendershop.com for your new site. That’s going to be about all the things you can do with blenders. But you pop that into a domain service like Namecheap and discover it’s not available.
You’ve got a few options to create some workable fixes:
- Try adding an ‘s’ at the end – blendershops.com
- Try adding ‘the’ at the start – theblendershop.com
- Consider other extensions. While .com is always the best, .co or .net aren’t going to ruin your site – blendershop.co
- Think about related terms if none of the above work – blenderrecipes.com, theblenderchef.com, blendercentral.com, etc.
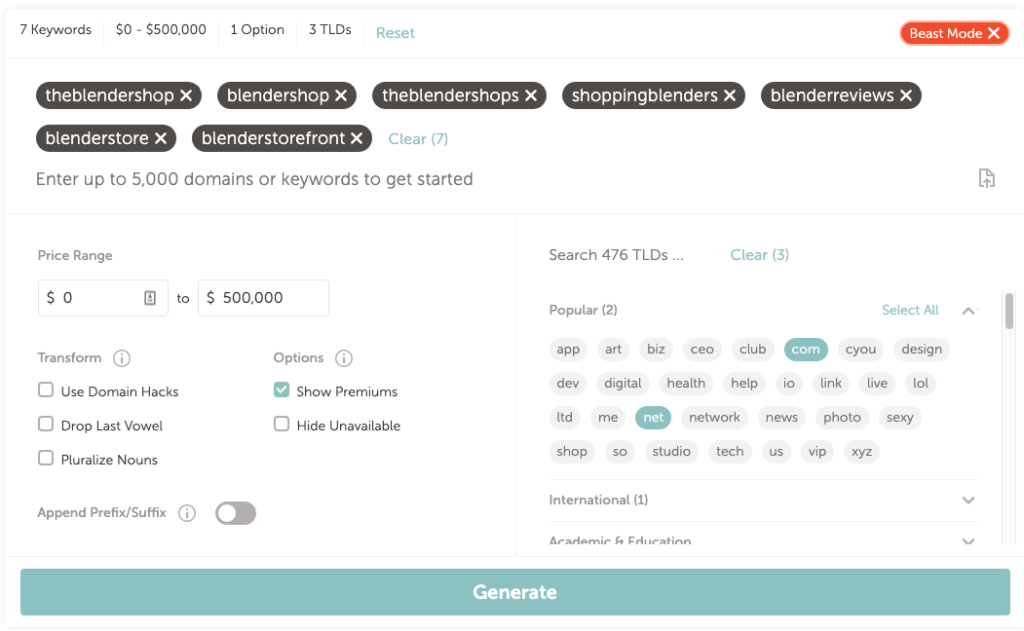
If you get stuck, one cool feature of Namecheap is they allow you to do a bulk domain name search. They call this “Beast Mode.” You can brainstorm a ton of ideas (if needed) at once.
Click on this link, and you’ll be brought to that page. Select Beast Mode, type in a bunch of ideas, or anything that pops into your head, choose the extension you want (ideally a .com) and click enter.
You can see it in action here. We put in a couple of name ideas and picked .com, .co, and .net as the extensions.
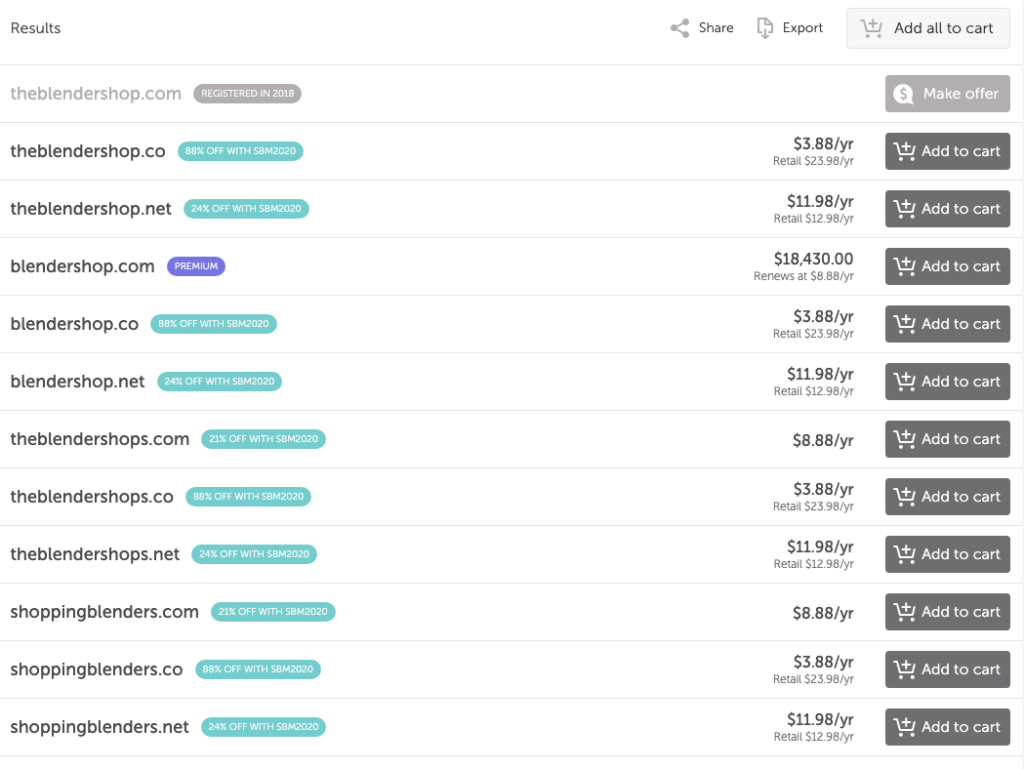
Click Generate.
Then you’ll easily be able to see what options are available. To buy one, click Add to cart.
Once you’ve purchased your domain name, you need to hook it up with the
- Login to your NameCheap account
- From the dashboard, pick the domain name you want to use and click the manage button
- Under domain, scroll to where it says Nameservers
- Click Custom DNS from the dropdown
- Add
Bluehost ‘s hosting nameservers, one for each line.- ns1.bluehost.com
- ns2.bluehost.com
- Click the green checkmark button to save your changes
Note that it could take up to 24 hours for your domain name to point to your
If you get stuck at any portion of the above, contact NameCheap support. If you scroll to the bottom of the page on your dash, they have a button to open up a live chat.
If you’ve bought your domain through some other service (not
Ok, now back to
You can also choose to skip this step about buying a domain. Just click I’ll create my domain later and go ahead and create an account.
For now, we’re going to go ahead as if we have our own domain. But, if you do want to use
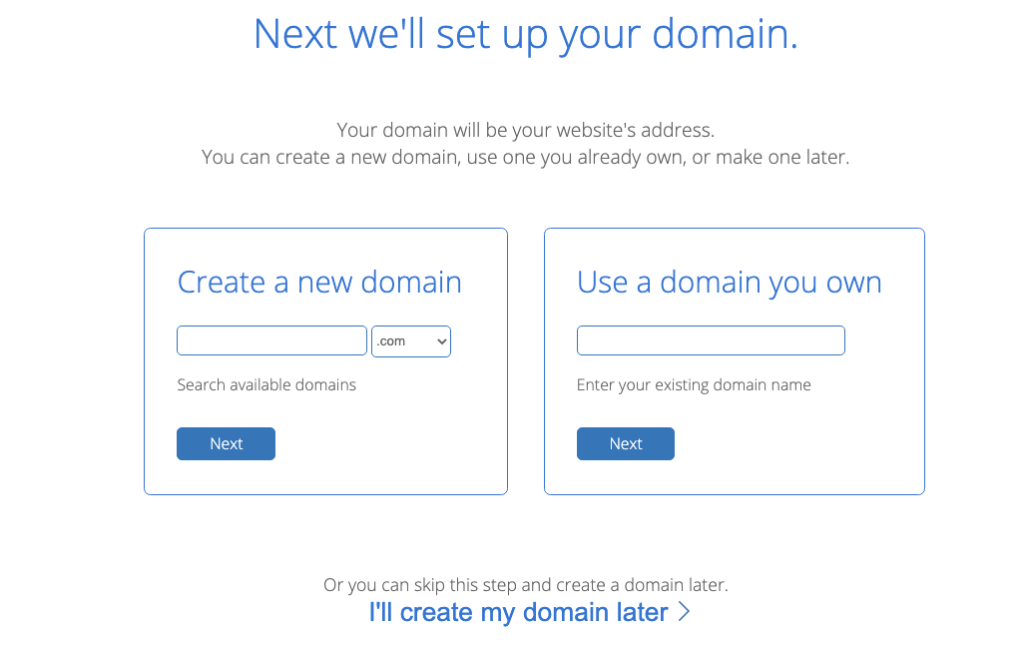
Getting a domain through Bluehost
Remember the “sign up now” page from above? Well, if you need a new domain, then you enter the domain you want to use in the “new domain” box.
We know from our search at NameCheap that shoppingblenders.com is available, so let’s go with that.
Click the ‘next’ button, and you’ll be asked to create an account and pay for your package.
Note that the longer you set the account plan for, the cheaper the monthly rate will be. The system defaults to 3 years.
Also, when you’re just starting out, you probably don’t need many of the additional packages to start. Read through each and decide if they are right for you. If you want them and have the budget, go for it, but you don’t need to worry about spending the extra cash right away.
Once you’ve decided what you’re going to go with, enter your credit card information and click ‘submit.’
After you’ve done that, you’ll be asked to create a password for your account. Don’t forget this!
Bluehost will send you an email confirming your information. From there, log in to your
Note: If you’re moving from one domain name to another, here’s how to change your domain name without hurting SEO.
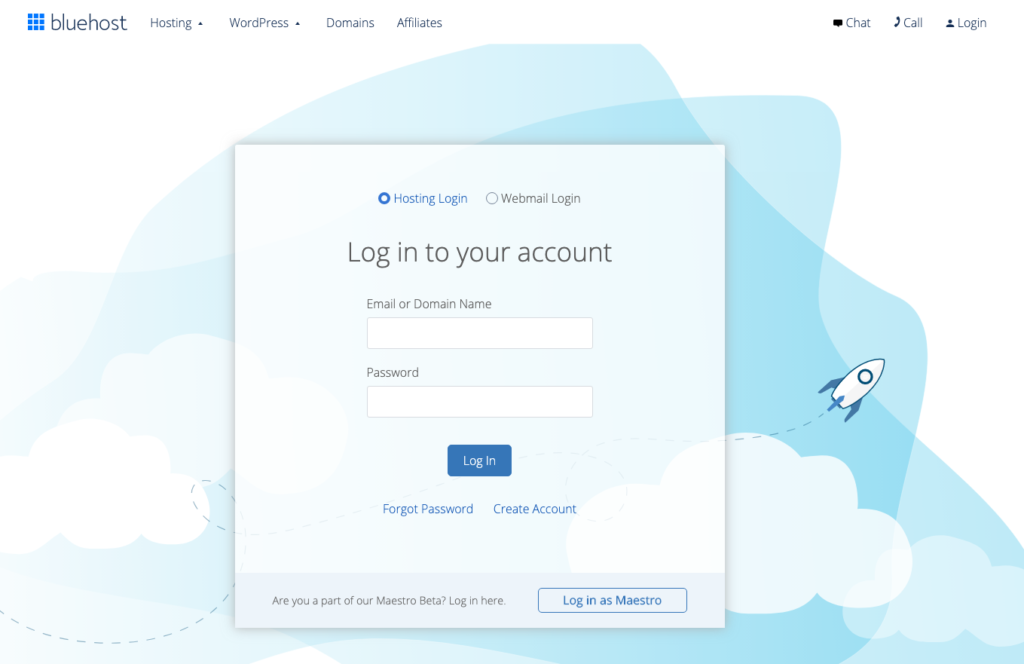
Step #4: Log in to Your Site
The first time you log into your site
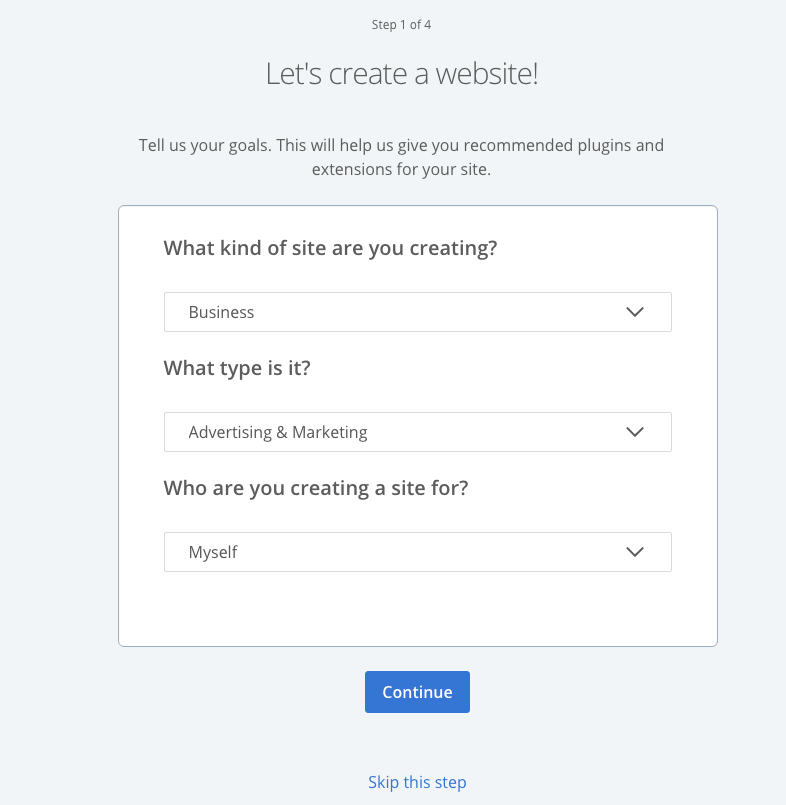
Here they are in order.
This first one has a bunch of options that fit most people. If you aren’t sure, you can just go with a blog. Remember, there are no wrong options here; you aren’t going to mess anything up if you change your mind or pick something you realize you didn’t want.
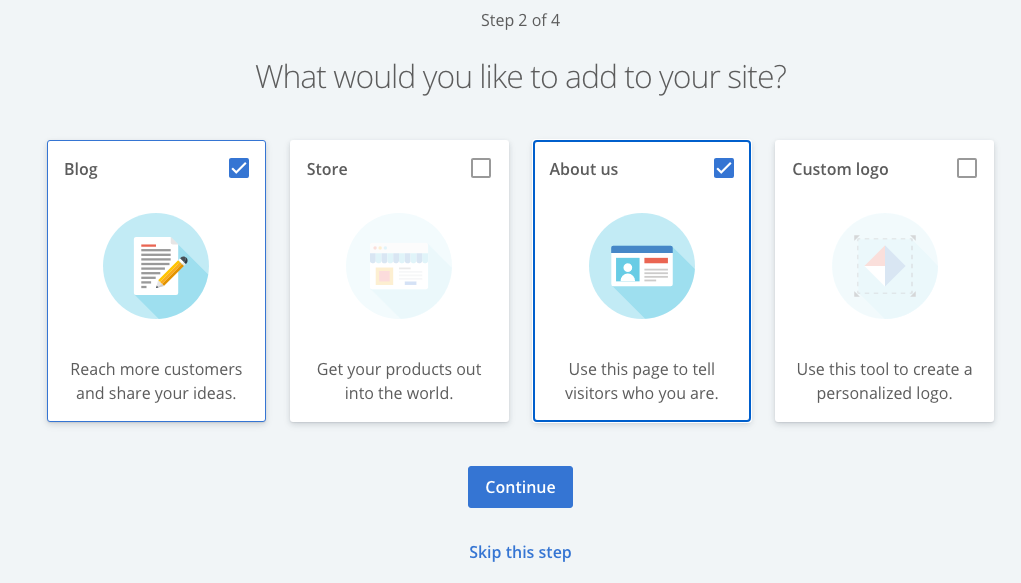
With this step, you can pick what features you want to be added to your site. Most of you will want a blog, and everyone will want an about page. You don’t need to worry about a logo right now. And only people who are selling things from the start need to select a store.
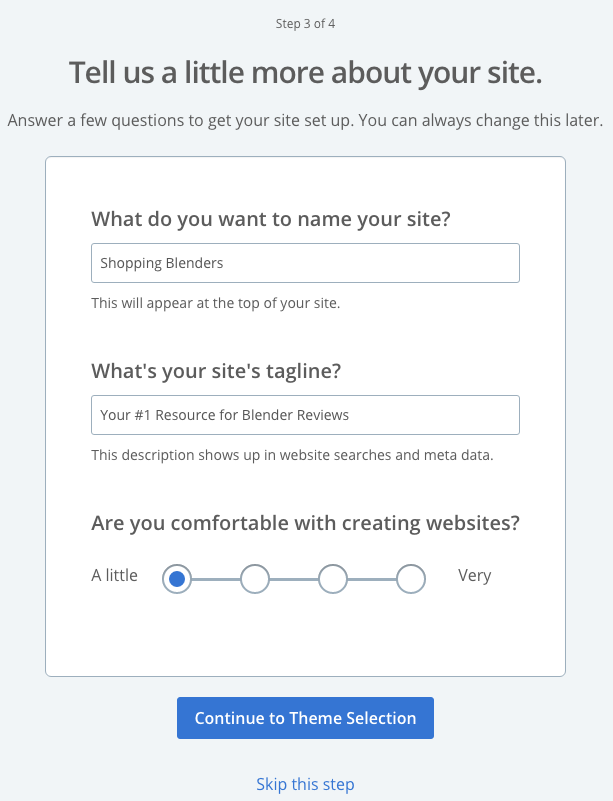
Alright, here, just add your site’s name.
For a freelance writer, you can just use your name. And the tagline is optional. You can always go back and add this in or change it later.
Unless you’ve set up a site before, select “a little” for your comfort level.
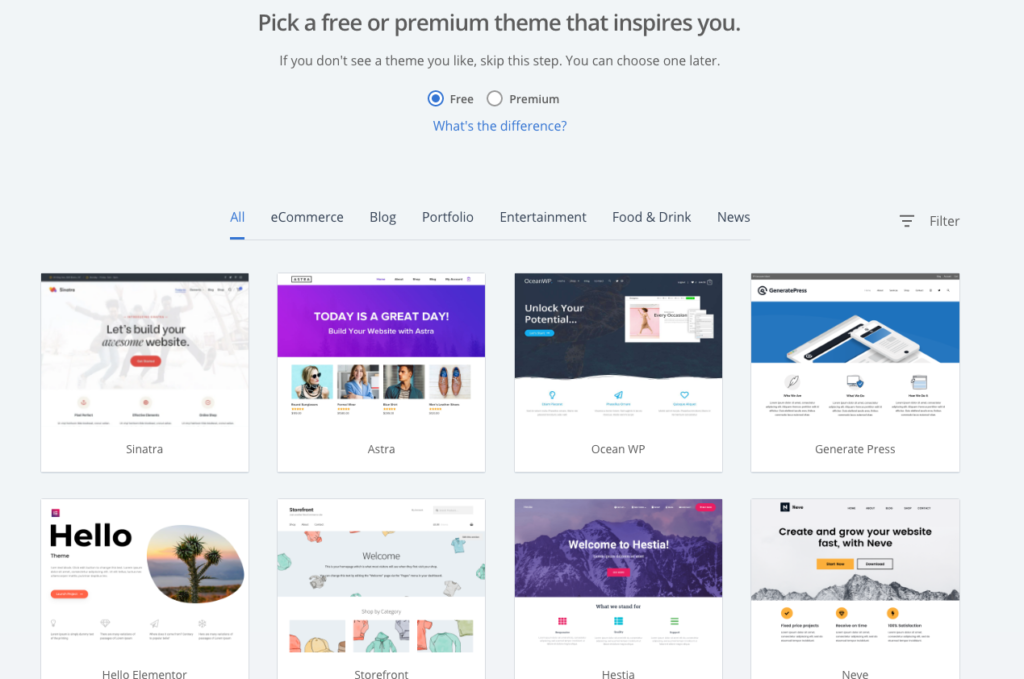
Ok, next we get to the themes.
WordPress has a few standard free themes ready to roll. And
If you’re truly crunched for cash at the start, a free theme is fine. For now, pick something that is basic. A lot of people get stuck because they pick some super fancy theme with a ton of features they don’t need and it can be a monster trying to set up.
You can avoid a ton of headaches and save a lot of time by going simple at the start.
You don’t want to rely on free themes for a long time. We recommend getting a premium theme up and running as soon as you can (which is covered in Step #7).
If you already have a theme, you can skip this step and upload yours later.
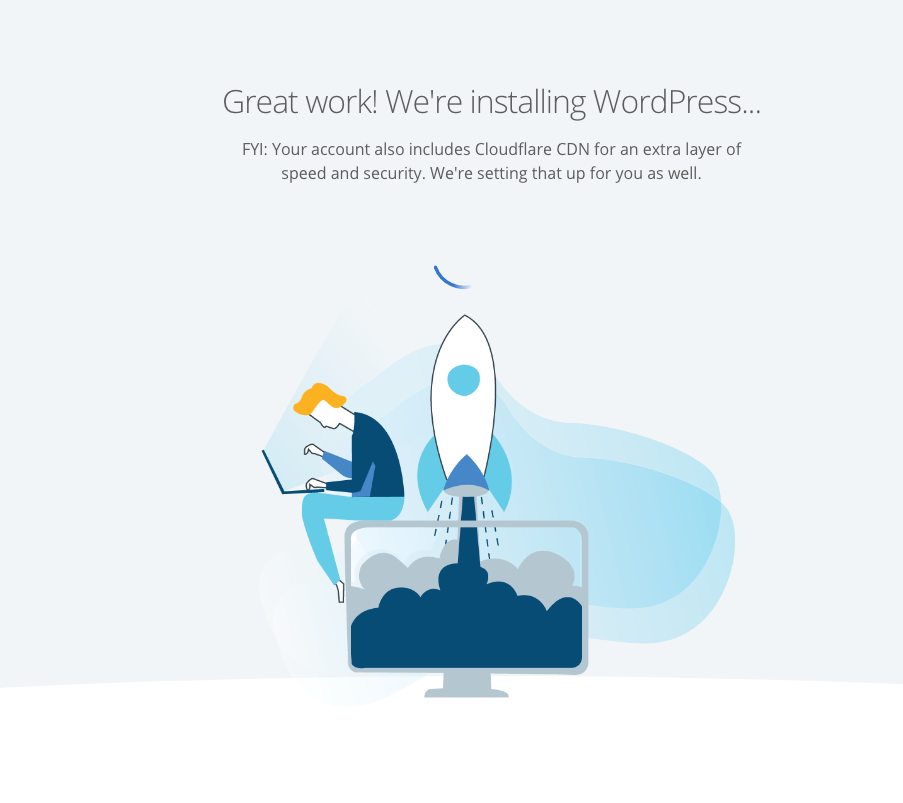
Whoohoo, WordPress is installing, pretty simple, right?
Just a note, you might see this screen for a few minutes, so be patient.
And, with ANYTHING website related, anytime you get stuck on something, contact BlueHost support. They are there to help you.
Ok once you’re set with that you’ll be on your site’s
It should look something like this:
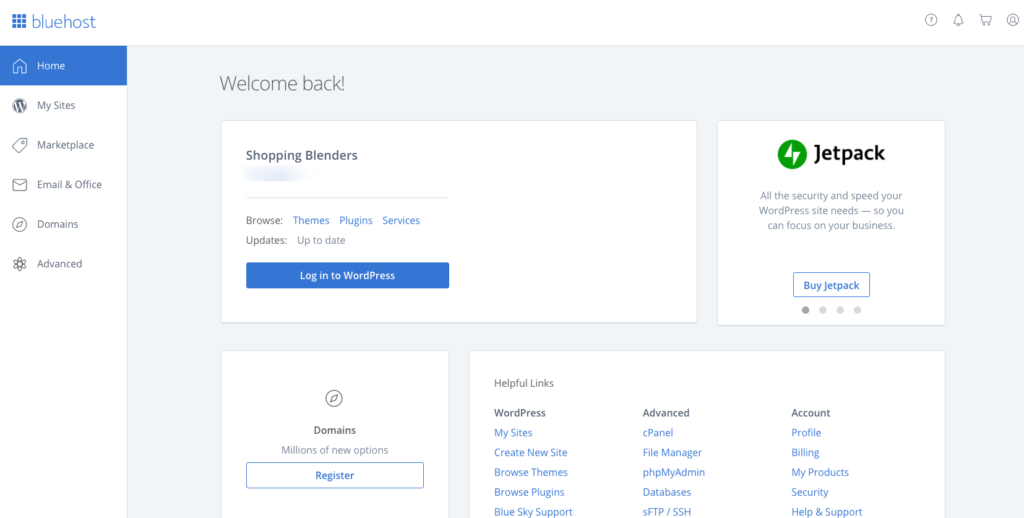
You just need to click the blue Log into WordPress button and it will bring you to what’s called the back end of your site. That’s the part of the site only you can see.
You can also log in to WordPress by going to youdomainname.com/wp-admin
Both will bring you to the same place.
Remember, if you get stuck at ANY portion of the above, contact
A lot of people get stuck at one point or another getting a website up and running and that can derail your progress. So don’t hesitate to contact them if you do find something that doesn’t look right. Don’t waste your time getting super frustrated if you can’t figure it out easily.
At this stage, we’re all about forward progress, so do everything you can to avoid hitting a wall.
Step #5: Explore the Back-end of Your New Blog
We could stop here, but I’d like to give you just a little bit more information to make sure you can get your site looking good, and keep you from making excuses on why you “still can’t get started.”
We’ll break down each of the sections of your new site, so you’ll have a better idea of what each one does. Every time you log in, you’ll get sent to your dashboard.
Here again, you’ll see the backend of your site. Once you’ve clicked launch button you’re good to go. From here,

The most important part of this page is the navigation on the left-hand side of the dashboard.
This is where you’ll do everything from write blog posts to view comments, and change the look and feel of your site.
As you install different plugins, you’ll notice your dashboard will begin to have more items. Here, we’re just going to cover the basics to get you started.
For a few quick tips, let’s look at the most common things you’re going to click here:
- Posts: A list of your blog posts (you can create a new post here)
- Pages: A list of all your website pages (you can create a new page here)
- Media: An overview of your images/video library (you can add new media here)
- Comments: An overview of all the comments on your blog
- Links: A list of links you’ve added to your site or blogroll (you can pretty much ignore this)
- Appearance: This is where you can tweak your theme, menus, and widgets plus do any changes to the CSS of your site
- Plugins: A list of all the plugins you use on your site (you can add new ones here also)
- Users: A list of all the users who have registered on your site, plus your profile (you can add new users here)
- Settings: Here you can access many of the general settings of your site like the name, how comments are viewed, the date and time, how blog posts appear, etc.
These are the main menu links you’re going to spend the most time using. It’s a good idea to explore each of these on your own so you can get a better understanding of what they do.
Step #6: Install a Blog Theme
Even though you have a free theme to start with, you want to get a premium theme installed as soon as you can afford it.
This is probably the most important step of the second half of this tutorial.
A WordPress theme allows you to keep all of your content the same, but make your site look completely different.
By installing a new theme you can make your site look beautiful and professionally designed with very little work. You can use a free theme to get started if you’d like.
However, based on my experience it’s worth paying an extra $40-75 for a premium theme.
Why?
Because not only will it look better, but it will be easier to customize to your liking, and less technical to make major changes.
I personally recommend you check out Theme Forest. This is where I buy 95% of my themes, and I’ve always had really good luck with the ones I’ve bought on there.
As you look for themes, a couple of things to keep in mind:
- Always look for something that has an active support team, you will need it at some point, make sure they are there for you.
- Pick something that has good overall reviews.
- Keep it simple to start, a lot of people get caught up because they pick a massively complex theme and it throws them, you don’t need that right now.
Here are some more tips on how to pick the right theme for your website.
If you’ve bought a theme, you’ll have to download it from the site where you got it. It will come as a .zip file, and you do not need to open that up, it can be uploaded directly into WordPress.
Here’s an article on how to install your theme into WordPress. But it’s pretty simple.
How to Install Your New WordPress Theme
It’s super easy to install a WordPress theme:
- Click Appearance (on the left toolbar) and Themes.
- Then at the top of the page, click “add new.”
- If you have already bought a theme that you want to upload then click the “upload theme” button.
- Choose your .zip file and click “Install Now.”
- Once done, go back to your main theme page and you will be given the option to either preview your theme or activate it.
 The preview is just that, it will show what the theme will look like when it’s live. If everything looks good, click “Activate.”
To customize parts of your theme, like the color, headings, number of sidebars, etc., click “appearance” on the left side menu and then customize.
Every theme will have different customization options, and many of the premium themes will have their own dedicated menu in the dashboard sidebar.
Look for a new menu item, or look under the “appearance” menu to see if you see a theme with your name on it.
One last benefit of a premium theme is that usually their documentation and support is much better. If using Theme Forest, look for themes that say “well documented” to make sure you have all the help you need customizing – as each one does act differently.
And don’t forget, you can always go back and change things if you don’t like them!
Step #7: Create Your First Blog Page
Next, you need to learn how to create a page. A page and a post are very similar with a couple of key differences:
- A post is listed in reverse chronological order on the page you specify in Settings > Reading. This is essentially your “blog”
- A page is static and has no date on it.
- If you’re writing a blog post it should be a “post”, if you’re adding say an About page or a Contact page – then you should do it as a “page”.
Moral of the story? Don’t go crazy. To start you only need a handful of pages. Here’s what I recommend:
- Home
- About
- Contact
- And a dedicated page for your blog
That’s it to get started. Once your site is up and running you can add more pages if you like, but these are the essentials.
Here’s how to do it.
On the left sidebar click Pages then click Add New. 
We’re going to cover a few different aspects of a page here.
First where it says “Enter Title Here” this is the title of your page, for example, Home, Contact, About are all options.
Right under the title, you’ll see it says “Permalink,” which is the URL for this page.
Click Edit to change the end of the URL. So, if you were going to call this your About page, the URL will be youdomain.com/about.
Setup a Blog: How to Update Your URL Structure
If you notice your URL structures are showing up funny, you might need to edit your “permalink structure.”
Do this by clicking “Settings > Permalinks.” I would then recommend changing from “default” to “Post Name.”
This will make your URLs show up like this: https://www.locationrebel.com/sample-post/
Instead of like this: https://www.locationrebel.com/?p=123
Setup a Blog: How to Add Content
To add any photos, video, or audio, click “Add Media”.
Then in the big white box is where you write your content.
The items at the top you’ll see are very similar to what you’d find on a Google Doc or Microsoft Word, so you should be familiar with those.
On the right-hand side, you’ll see a few boxes:  These are pretty self-explanatory.
The Publish box allows you to determine when you want your page to go live. You can publish immediately, or if you’re not quite ready, save it as a draft, or schedule it to be published at a later date.
The Page Attributes box is where you will decide if you want to use a specific template for your pages (some themes offer this).
You can also pick where your page is going to appear on the website.
For example, if you want this page to be an About page, then you can leave (no parent) and it will appear on your home menu. But say you have two people you want to feature on your About page. You could have a page called About Sean and another called About Liz.
If this is the case, your About page would be the parent page, and when a visitor hovered their mouse over the About page, two drop-down pages would appear, one About Sean and the other About Liz.
That’s how a parent page works.
You can also set the order of the dropdowns in the Order box. If you wanted About Sean to appear first, have that page be 1 in order, and About Liz be 2 in order.
Next is the Featured Image box. Use this if you want to have a specific image on your page.
Some themes require you to have a featured image on your posts or pages. So if you happen to see a broken image link when you preview your page, that might be why.
Once your page is good, click Publish and you’ll be able to see it on your site.
Step #8: Create Your First Blog Post
I’m gonna go out on a limb and say you’re probably pretty interested in starting a blog.
So here’s how you can start it.
Since you’ve already created your Blog page, you can now create your blog posts.
Again, head over to that left-hand sidebar and click Posts and Add New.
The cool thing is a blog post page looks exactly like a page, so you already know exactly how everything works in terms of composing your post, tilting it, and adding media.
There are a few differences to pay attention to on the right sidebar with your posts, same as with the box above with your pages.
The Publish box is obviously the same as with Pages.
The Categories box is there if you want to group your blog posts in certain categories. So, if you’re writing a travel blog, for example, you might want categories to be Europe, North America, or Asia. That way, when a visitor clicks on a particular category, they will see all the posts in that category.
The Tags box works much the same way, but you could break posts down across a number of categories. Let’s use a travel blog example. You could have tags like: hotels, flights, or food. Then when a visitor clicks the hotel tag they can see all posts with that tag, regardless of category.
The last box is Featured Image. Most themes will feature blog templates that allow for a big picture right at the top of the blog post which will also appear on your main blog page like this:

The HDR Software home page. You can see the featured images.
How Do You Decide What to Blog About?
Now that you know the specifics of how to create a blog post in WordPress, what about the actual content?
Don’t worry, we’ve got you covered there too.
- Blog Post Ideas: 100 Fool Proof Ideas for Your Next Blog – Not sure what to write about? Don’t worry, here are 100 ideas!
- 62 Ideas for Your Next YouTube Video or Blog Post – Those 100 up above not enough for you? Here are two videos featuring 62 more content ideas,.
- 15 Types of Blog Post Titles that Get Clicked: A Beginner’s Guide – Once you’ve written some posts, they won’t mean a lot if you can’t get people interested enough to click on them. Here are 15 blog post title templates that get clicks.
- How Long Should Your Blog Posts Be? – A simple way to figure out how long each blog post should be.
- How Much Info Should You Give Away for Free? – Trying to decide if you should create an online product, or give away all the goods on your blog? This post will help.
Step #9: Install Essential WordPress Plugins for Your Blog
Plugins are the things that really make WordPress special.
Basically, a plugin is a third-party tool that you can upload to your site and add a lot more functionality.
Head to the left-hand menu again, and click Plugins then Add New.
You’ll be brought to the Plugins page where you can install a plugin you’ve already downloaded, search for a particular plugin, or browse some of the most popular plugins used by WordPress bloggers.

Yoast is one of the more popular WordPress SEO plugins.
You can see the box for each plugin gives you some useful information, like the name and a description, the last date it was updated, if it’s compatible with the version of WordPress you have installed, and the number of reviews.
If you click, More Details, a pop up will open that shows you some screenshots of the plugin, more details about the plugin, some FAQs, and in depth reviews.
Once you’re ready to install, click Install Now. 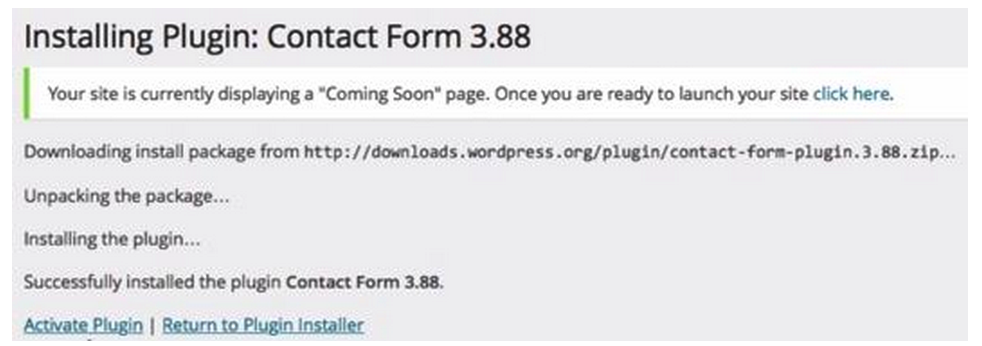 You’ll see this screen, once you see where it says “Successfully installed….” click Activate Plugin.
Your installed plugins can all be found by clicking Plugin and then Installed Plugin from the left side menu. Here you can see what’s active, what needs an update and can access the settings for many of the plugins.
This is what they’ll look like on your Installed Plugins page:
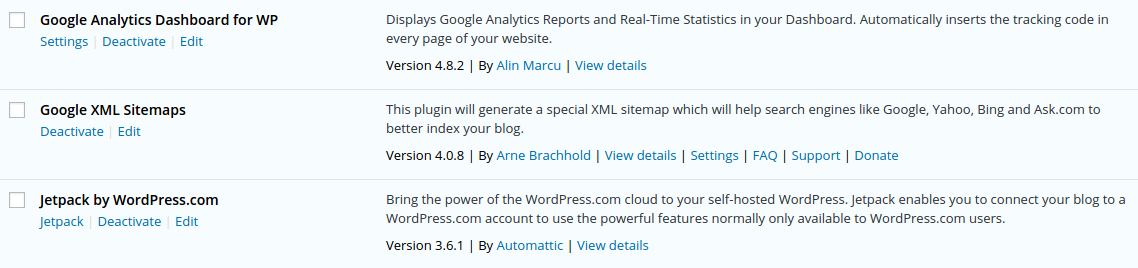
There are plugins for virtually everything and anything, but there are a few “must haves” that you should get started with:
- WordPress SEO by Yoast: This is the go-to SEO plugin out there, it makes it super easy to get your posts and pages SEO ready so they can be found more easily online.
- JetPack by WordPress: This plugin allows you to manage your WordPress site with a ton of special features, including an easy way to track your site statistics.
- Google XML Sitemaps: It’s not sexy, but this plugin makes your site easier for search engines to index.
- Askimet: Pretty much every WordPress blog comes with this plugin, use it to help reduce spam on your site.
- Contact form: Remember when we said you need to have a contact box on your site, use Contact Form to do it. It lets you create a simple box that’s super easy to use.
- Security plugin: You want to protect your site from hackers. Even if you don’t think anyone can find it (yet), they are out there. So, use this plugin to block hackers and bots that are trying to access your information.
- Image smusher: Having lots of images is awesome for a niche site, but it also has the potential to slow it down a lot. This plugin smushes your images down to a fraction of the size, so your page will load faster.
- Social media: Make sure you have the ability to have your content be shared on your site. This plugin lets you do that easily. You can decide if and where you want the content to be shared (i.e. posts vs. pages).
Once you’ve got the basic plugins set, then you can start adding more features to your site.
The bottom line is that if there is some kind of functionality you’d like to add to your site, there’s a 95% chance there’s already a plugin out there that will help you do it.
So search for different plugins from the “Add new” plugin menu, or just search Google for what you need.
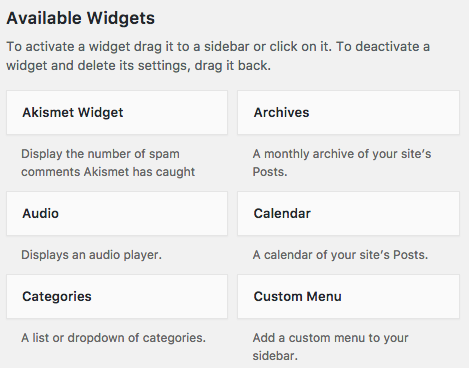
Step #10: Activate Blog Widgets
Most website themes will come with specific spaces where you can put special menus. Usually, you can find these spaces at the header and footer of your site, plus on the sidebars.
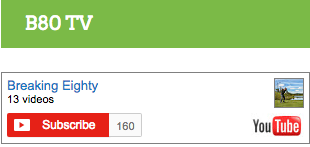
See these smaller boxes on the right side of my site Breaking Eighty?
Those are widgets. 

 Now, you can do a ton of stuff with your widgets, but most people keep it pretty basic, including things like a search bar, email sign up form, Facebook like box, or recent comments, just to name a few.
You control what goes where and what you want to show with widgets.
So head to the left-hand sidebar again and click Appearance and then Widgets.
As you can see, there are lots of widgets available: This is the widget menu, here is where you’ll see all the widgets you have available on your site.
Now, on the right-hand side of the page, you’ll see the places in my particular theme where I can put widgets.

You’ll see a couple of spots in the header, and then four footers. Your theme might have more spots available.
All you have to do to activate a widget is simply drag it over to the place you want to put it.
Simple, right?
You can play around with your widgets to see what you like where. You can also use “text” widgets as places to add in any special coding that can create a new widget for you.
If you don’t want a certain widget to be active any longer, simply drag it back over to the available widgets section and it will be removed.
Additional Reading: Not sure what widget/pages/plugins etc. to include on your site? Check out: The 60 Minute Blog Audit to get some direction.
Step #11: Create a Primary Menu in WordPress
Your website is almost good to go.
Just one last thing you want to take care of, and that’s creating menus. The menu is going to help you determine what pages get shown on your site. You can also use menus to showcase only the pages you want visitors to be able to access.
To start, click Appearance and then Menus from the left-hand sidebar on your dashboard. Since you won’t have any menus to start with, you want to click “Create Menu.”
Next, you simply want to decide what pages you want to show in your menu. On the left side, you’ll see a box with all the pages you have created.
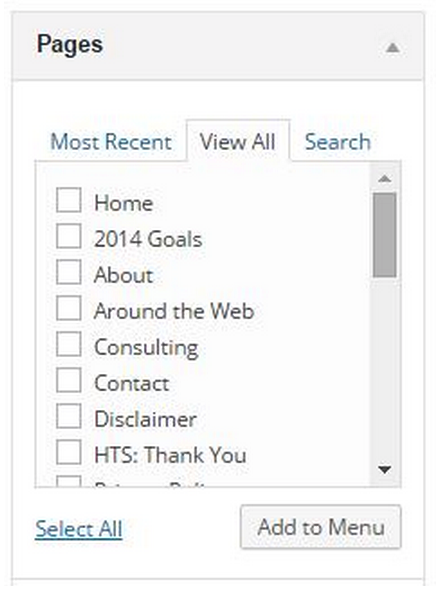
As you can see, I have a bunch of pages, but I only want to showcase a handful on my site for visitors to see. That’s where the menu comes in handy.
You simply click the box next to the pages you want to be in your menu, and then click Add to Menu.
Here’s what it will look like:
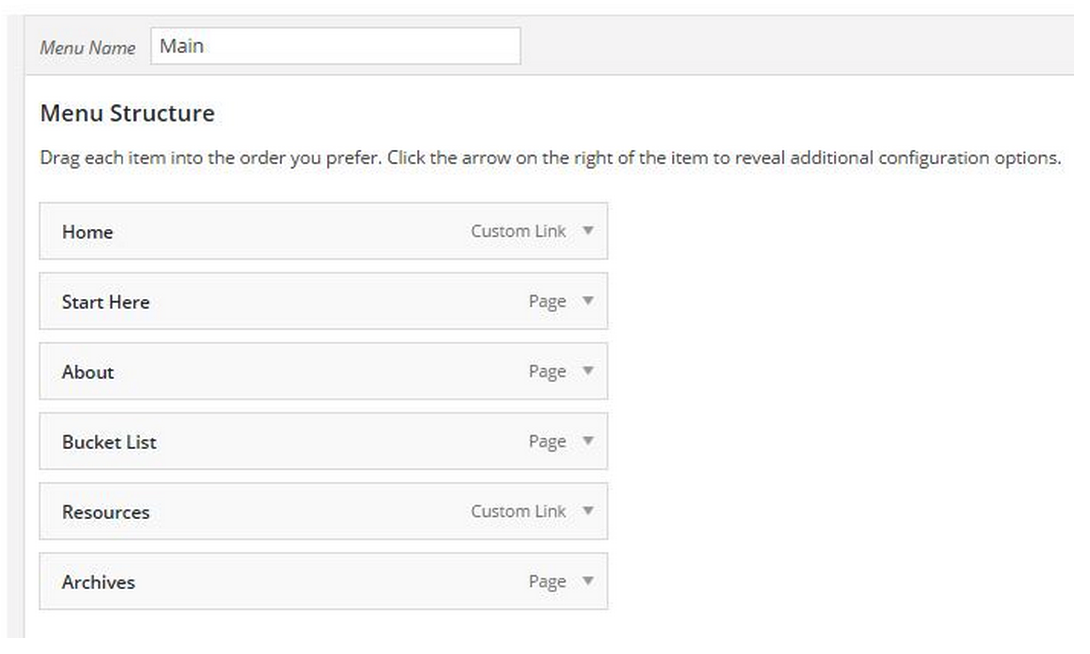 So even though I have a bunch of pages in the pages box, I only selected a handful of them to be in the main menu.
You can then click and drag each of these boxes to put them in the spot you prefer. You want to be sure you know where this menu is going to be displayed.
In this case, my theme allows me to put a menu in the footer or have a main menu, this is going to be my main menu, so it will show at the top of my website.
Once you have your menu set, click Save. Here’s what our old home page menu looked like:

See how they match the menu structure?
On the home page, you’ll also notice that it just shows my most recent blog posts – there isn’t even a “Blog” page available on the menu.
I don’t have what’s called a “landing page” where you would then have to click a menu link over to get to my blog. I like to have my blog right there front and center.
For most people who want to create blogs, you should have your “home” page showcase as your blog. You can change this later on if you start to get into more advanced marketing tactics, but for now, it’s unnecessary.
So in order to have our blog show up on our home page, there’s one other setting we need to double check.
On the left side toolbar, click Settings then Reading, you’ll see this page: If you want your main home page to feature your latest blog posts, just copy these settings.
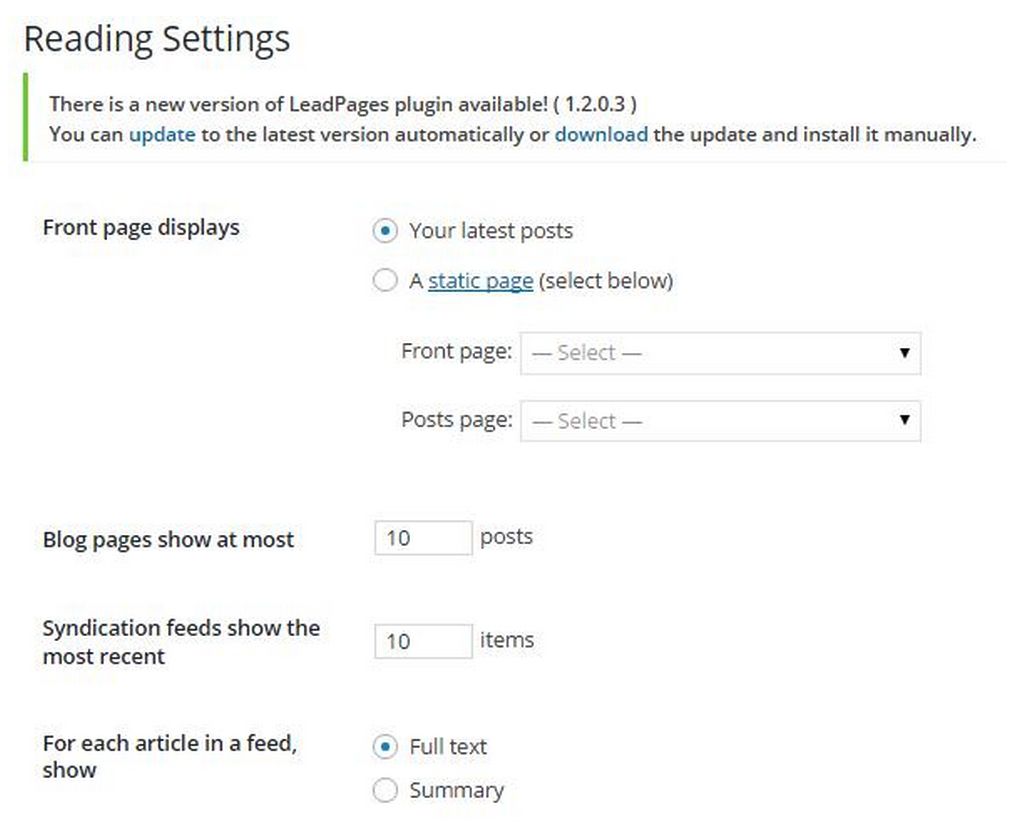
If you want your main home page to be a true home page, and have your blog be a separate page, then click the toggle next to “A static page.”
For the Front page choose from the drop-down the page you want to be your front page, this could be a home page, a sales page, anything you like.
Then for the Posts page, use the drop-down to select the page your blog is called. Click save and you are good to go.
A Few More Pieces of Advice (Things I’ve Learned from 10 Years of Blogging)
This post walked you through all of the specifics of the technical side of starting a blog. But I’ve learned a thing or two about how to make a site a success early on.
These are a collection of posts I’d recommend reading to help you with the strategy, the mental side of starting a blog, and some next steps for making your blog posts even more effective:
- 59 Amazing Content Marketing Tools for Your New Blog – Want to actually grow your blog? Consider some of these tools to help you spread your reach.
- How to Create Killer Images for Your Blog – These days more than ever having good looking images to capture attention and keep people engaged is huge. These are some really easy ways to create great looking images and media for your posts.
- 10 Easy Split Test for New Bloggers – Early on you don’t need to go overboard with the nitty gritty of testing. But dipping your toes into these split tests can be a good intro to the idea of running tests on your site.
- How My Blog Became a Commodity (And How We’re Fixing It) – Finally, this outlines the biggest mistakes I’ve made with this site. Don’t fall into the same trap I did.
- “Do I Need to Register My Online Business?” – This is a super common question for new bloggers and freelancers. The answer might surprise you.
Blogging Alternatives: 3 Other Online Businesses to Consider Other than Blogging:
- Niche Sites – This is a form of blogging, but with a much more targeted focus and specific content strategy that centers around affiliate marketing.
- Freelance Writing – Rather than creating a website of your own, consider creating content for other people’s websites.
- Physical Products – Want to make something physical and then sell it online? There’s a lot of opportunities if you’re willing to put in the work.
If you’re just looking to make passive income through a blog/niche site, then after you go through the above steps in this post, you’ll want to watch this:
The Importance of Building a Blog Audience
The whole point of starting a blog is to get people to read it, right? Well, there are some important things to keep in mind as you get going. Specifically, traffic is great – but traffic without cultivating an audience won’t do you much good.
See what I mean in this video:
Final Thoughts for Setting Up a Blog on WordPress
Ok, I know that was a lot of information. But if you made it through, this tutorial then you now know exactly how to start a blog. Just a few of the things you’ve learned are how to:
- Get a Domain
- Set up a hosting account with Bluehost
- Install WordPress
- Install your WordPress theme
- Understand the basics functions of WordPress (Themes, posts, pages, menus, plugins, widgets)
Every theme is different. So, your experience may be slightly different than the tutorial outlined here. But if you go through your theme documentation you should get extremely in depth help tailored to your situation.
If you’ve been putting off starting a blog or website because you simply “don’t have an idea” or “don’t have any technical experience” use this post to try and push past those hesitations.
I firmly believe this is the absolute best step you can take to start making major changes in your life. So if you run into any issues and need help, your best bet is to contact your hosting company. And if it’s a theme problem, contact them. These companies have help desks set up just for this purpose. I’ve also found success searching on YouTube too.
Next Steps for Starting a Blog
Now with that, head over to Bluehost, get your domain and hosting, and let us know when you’re new site is up and running!
This page contains affiliate links. This means that if you click a link and buy one of the products on this page, I may receive a commission (at no extra cost to you!) This doesn’t affect or opinions or our reviews. Everything we do is to benefit you as the reader, so all of our reviews are as honest and unbiased as possible.

Sean Ogle
Sean Ogle is the Founder of Location Rebel where he has spent the last 12+ years teaching people how to build online businesses that give them the freedom to do more of the things they like to do in life. When he's not in the coffee shops of Portland, or the beaches of Bali, he's probably sneaking into some other high-class establishment where he most certainly doesn't belong.Join over 40,000 people who have taken our 6 part freelance writing course. Sign up below and let’s do this together.
By entering your email address you agree to receive emails from Location Rebel. We'll respect your privacy and you can unsubscribe at any time.

Thank you Sean for this excellent tutorial on how to setup a blog. Unfortunately I made the mistake of signing up with wordpress.com for my blog after listening to your podcast from beastlygentlemen and this tutorial could not have come at a better time.
Thanks Giahung. You can also pretty easily transfer content from wordpress.com to wordpress.org if it’s something you want to do. Let me know how it goes!
Hey Sean,
I really want to thank you for sharing your experience and knowledge. Your site was the final spark that made me decide to finally take the plunge and go for it! This is after spending the last several years of reading blogs from other digital nomads and location independent folks.
I’ll have a new site up this weekend with the intent to learn all I can, make it happen and share it all to help others do the same! Hopefully one day we can all be living our dreams!
Thanks for the inspiration!
Yeah! Make sure to let me know when you get the new site up 🙂
This is the most detailed post on the topic. Where the hell were you in 2008?
Good question, probably still not even knowing what a blog was 🙂
I don’t know if you’ll be able to answer this, or not, but, how easy will it be to change my gravatar to direct to my new site, and how long does it usually take for the redirect to take effect? Any idea? Thanks.
So your gravatar is based on your email address, not your site. So just make sure your using the email address with the gravatar on the new site.
Starting a blog is an excellent way to learn more about yourself and to share your experience with others. Reflecting on things and putting them down in writing really helps you solidify concepts in your brain and can really help you.
What I’ve learned in my two years plus of blogging is that this is a long-term process. At first you suck, but slowly you start sucking less and after a while you start plucking out more quality content. The key is to learn on the go.
Hey Sean, great how-to article.
By the way, there’s no need to add Google XML sitemaps plugin if you use SEO by Yoast – this plugin also has quite good xml generator built-in.
One other plugin that’s super useful – Google Analytics Dashboard for WP. It adds Google Analytics tracking code to your site, and shows all the most useful analytics data in WordPress admin panel – how much visitors came to your site, where they came from, bource rate and much more information (and this plugin is free).
P.S. you can click on my name in comment for more useful WordPress tips 🙂
Hi Sean! Great post, clear and easy to follow. You’ve come up with an awesome list for entrepreneurs who want to learn how to create their first blog. Your article is very valuable for small business owners because blogging can be a powerful tool to share knowledge and create qualified leads. A blog is great tool to build trust and become an expert in the eyes of your potential clients. I shared you are article on our blog, i hope that’s ok with you.
Finally, the missing pieces. I have secured a couple of domains through Bluehost but have not made them active yet because I have used Bluehost hosting with WordPress.org on a couple of expired domains but found it hard to decipher the lingo, what plug-ins to use, difference between page and post etc. The learning curve was a bit much for me, so I gave up, the 2 sites I had went no where fast. You have motivated me to try again with the 2 remaining domains I have. I agree that Bluehost has great customer service. You have done it here, great post. – Thank you Thank you
Aloha, Sean A friend of mine just began a blog to help set income ppl to invest in stocks and get good dividends. Well, if he can do it …. I think its time for me to just “shut up and start a blog!” So, here we go. Thanks for the step by step instructions. Michael
This is a great tutorial! I now have my site up and running! THANKS Sean!!!
Hi Sean, can I send you a private message. I would like to ask you questions about this tutorial and get your opinion if possible.
thats amazing sean i love it doing my blogging now !!
amazing
Thank you for this. I have thought about setting up a blog for a long time, but just didn’t know how to go about it. Started reading this on Thursday and had things up and running (though still incomplete) on Friday. Awsome tutorial!
Hey Sean,
Great article man!! This was the flagship post that has helped me dive into my new blog! Although it’s just starting out, this will be a great opportunity to track my new travel destinations and share them with others.
On a side note, I’m also interested in graphic design for my logos, and video editing for vlogging. Any suggestions?
Thanks!
-24 Traveler
Hi Sean,
thanks for this awesome blog post!
I have two questions:
Is it really important for SEO that I have a self hosted blog?
Would you reccommend to host the blog in the country where I am?
(I have a german blog for the german area in Europe.)
Thanks in advance for your answers
Volker Schaefer
Hey awesome post – Looks like and I know I am way behind the times as I’m almost 3 years behind.
Is all this still relevant and good to go?
If so I’ll crack on now!
I have just heard about a hosting site called SETT and wondered whether that is the thing to go for now?
Sean – from Ireland
Sean, it’s absolutely still relevant! And for what it’s worth, I’m not familiar with SETT – so could be a great platform, but hasn’t come across my radar yet.
Sean,
I chose Hostwinds instead of Bluehost. I have my theme installed, but clearly have much more to finish. Are the remaining steps you outlined going to work regardless of the host used?
Thanks,
Mitch
Mitch, yeah the process is generally the same and once you’re in WordPress it’s for the most part the same no matter what host you use.
I have previously used two web hosting providers. I could not get the performance I needed from either one, even with a paid caching plugin. I switched to Kinsta, and it has made a world of difference. Pages load very fast, and using the admin console is much more pleasant with the quick responses. So, Kinsta provides a better search ranking (because of the performance improvement), a better user experience, and a better admin experience. But, they do not offer DNS registration (NameCheap is good), and they do not provide email (again NameCheap). They cost more (I pay $30 per month for one site, but this comes with firewall security, automated backups, cache plugin, and a CDN). Overall, I believe Kinsta provides good value for the price with all they include and their top-notch performance. You can get WordPress hosting cheaper, but Kinsta is the way to go if you are serious.
Hey Sean!
Great stuff as always! I had a quick question: I set my website up around your other article for getting SEO writing gigs.
So my site is real simple: just an about page, rates page, home page, and writing samples.
If I’m going to start a blog, that should be on an entirely separate domain right?
I really want to thank you for sharing your experience and knowledge. Your site was the final spark that made me decide to finally take the plunge and go for it! This is after spending the last several years of reading blogs from other digital nomads and location independent folks.
Brilliant stuff. We have been reading your blog for some time and the content is excellent. Thanks so much for all the tips! best wishes
Also be certain to devote links in thee bottom part of your internet site so that your audience
will direct more traffic to youhr site by sharing your site
content with others. In addition, there were a lot off companies that
promised me a guaranteed ranking on Google, Yahoo and Bing.
You can even add this tactic for the checkout process when someone decides tto buy something freom you.
Feel free to surf to my bpog post –SEO Consultant Fernley
Hello
YOU NEED FAST PROXY SERVERS ?
Check it out this Anonymous and Private Proxy Servers.
– HTTP & SOCKS5 Proxy supported.
– IP Authentication or Password Authentication available.
– MORE INFO HERE: https://bit.ly/3ifZkmL
Thanks, Doreen Slavin
If you no longer wish to hear from us, please reply this email.
Asked what she would do if the travel restrictions continue in the coming months, Adeline sighed. That would be weird.
iguzar.com/goroskopy-gadaniya-magiya-ezoterika/9637-kakoy-harakter-u-koshkikozerog.html
Louisiana, Bad Elster. I like to dress pretty conservative and preppy.
Blogging is so rewarding, especially when you get positive feedback from your readers! I have just written my first article 🙂
Thank you for putting together such an in-depth guide, Sean! I’m going through it line-by-line to try and set up my writer website. Like you wrote, I’m mostly trying to keep forward progress on this.
Website design is definitely more complicated than I was expecting. I’m all sweaty.
HOW TO START BUSINESS – This company taught me how to start and market my six figure business. They take you step by step on how to build a brand new business and market it all for $7. Yes they try to sell you more but you don’t have to, you’ll have enough info. https://highticketfreelancer.com/enter/enroll?aid=42692
YOUTUBE – Youtube is okay way to bring traffic to your business. The great part about youtube is that while you are marketing you business your subcribers will grow then you can start making money youtube as well. Tip- Market your youtube channel as well and that will bring more subcribers and more views and more money.
TIKTOK – This is another way to bring in free traffic. Although it is not as volatile as facebook groups but from my experience it’s an ok method. IT’S FREE lol
Thank you for the amazing blog
easy readability.
ooh great, it’s an amazing blog thank you for the great information.
thanks for your content It helped me to start my blog ..
Great post Sean and in terms of CMS platforms which as of 2021 there are over 700 in existence, WordPress has been number 1 since it was introduced in 2003. So WordPress really is a great option and the amount of flexibility you have with it is excellent.